Proxy LLM with AgentWeave
AgentWeave supports proxying major LLM providers (OpenAI / Claude / Gemini) through the Proxy LLM feature. Once configured, you get a unified API Key that works with any OpenAI or Anthropic-compatible client.
Create a Proxy LLM Agent
- Go to www.agentweave.ai and sign in
- Click Create Agent and select the Proxy LLM template
- Upload an avatar and enter an agent name
- Select your LLM provider (OpenAI / Claude / Gemini) and configure the settings
- Click Create to finish
Get Your API Key
- Open the Agent detail page
- Navigate to Manage > Api Key
- Click Generate New ApiKey
- Copy the generated key
After setup, you will have:
- API Key:
agentweave-xxxxxxxxxxxxxxxx - Base URL:
https://chat.agentweave.ai/api/v1/chat/proxy/{AgentID}
Integrate with Claude Code
Install Claude Code
npm install -g @anthropic-ai/claude-code
Configure settings.json
Edit ~/.claude/settings.json (Windows: %USERPROFILE%\.claude\settings.json):
{
    "env": {
        "ANTHROPIC_API_KEY": "your_agentweave_api_key",
        "ANTHROPIC_BASE_URL": "https://chat.agentweave.ai/api/v1/chat/proxy/{AgentID}",
        "API_TIMEOUT_MS": "3000000",
        "CLAUDE_CODE_DISABLE_NONESSENTIAL_TRAFFIC": 1
    }
}
Start
Open a new terminal, navigate to your project directory, and run:
claude
Authorize file access when prompted and you're ready to go.
Integrate with Cursor
Note: Custom API Key configuration requires a Cursor paid plan (Pro or above).
When creating your Proxy LLM Agent on AgentWeave, make sure to select OpenAI as the provider. Cursor only supports OpenAI-compatible models — Claude and Gemini models are not available in this context.
- Open Cursor and go to Settings > Models
- Enter your AgentWeave API Key in the OpenAI API Key field
- Expand Override OpenAI Base URL and enter:
https://chat.agentweave.ai/api/v1/chat/proxy/{AgentID}
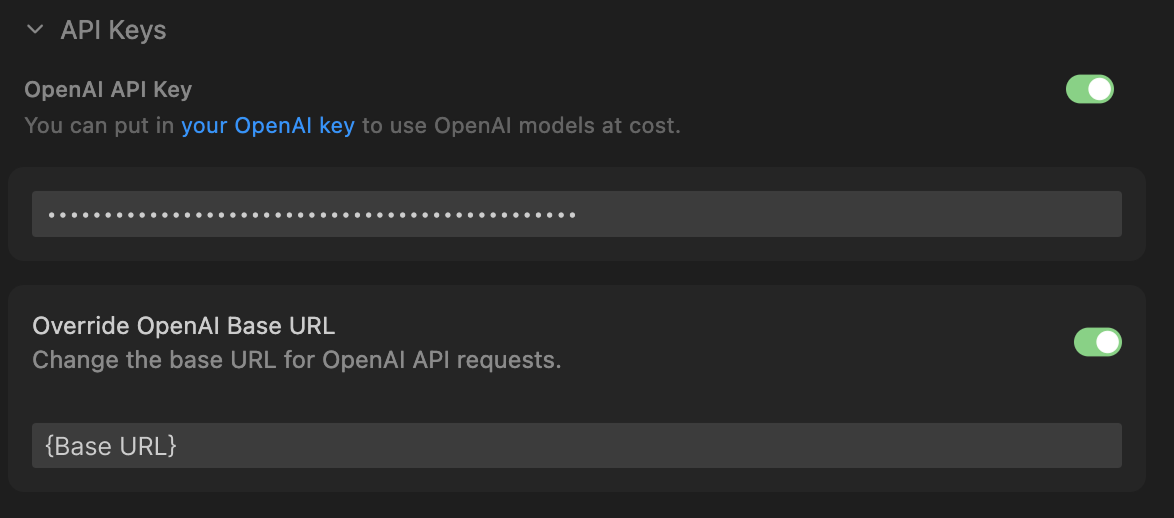
- Save and you're ready to use AgentWeave-proxied models in Cursor
Troubleshooting
Configuration not taking effect
- Close all Claude Code windows
- Open a new terminal and run
claudeagain - Verify the JSON format is valid
- If the issue persists, delete the config files and reconfigure
Claude Code v2.1.69 compatibility issue
When using claude-opus-4-6, set the following environment variables (see Issue #30926):
ENABLE_TOOL_SEARCH=0 CLAUDE_CODE_DISABLE_EXPERIMENTAL_BETAS=1 claude